Showing posts with label Hello Spring. Show all posts

Tuesday, April 02, 2019

Hello Spring

Hi, Janja is here with you.
Because of many descendants, rabbits are a symbol of fertility and new life that awakens in the spring.
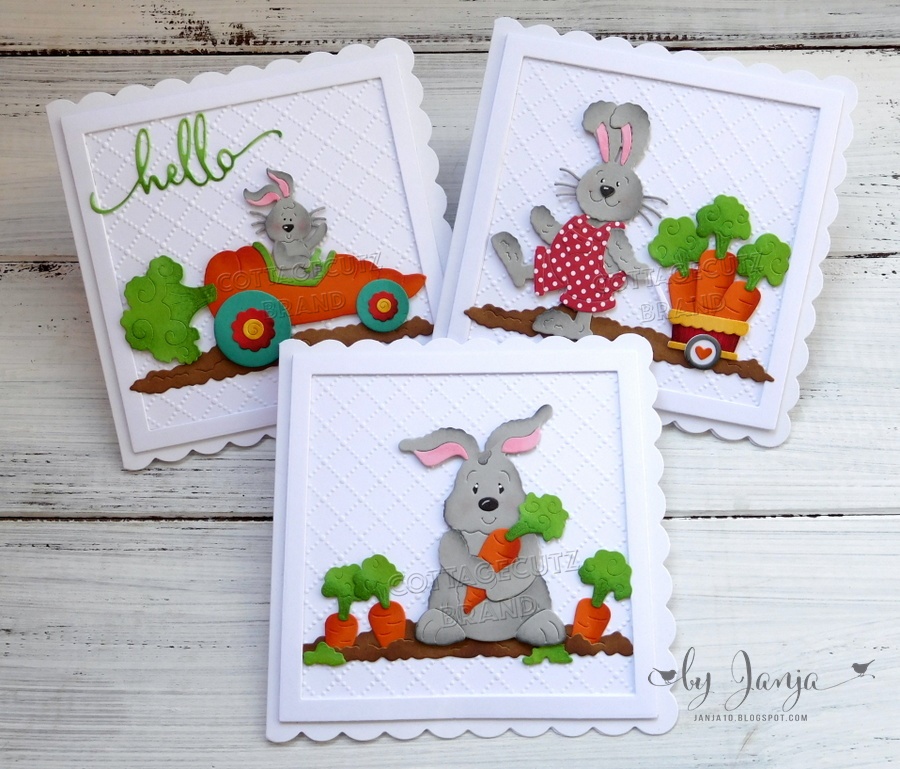
I made three cards with bunnies. I used dies from the spring release.


- CottageCutz dies: Bunny Carrot Car, Carrot Patch Bunny, Spring Bunny w/Cart, Hello Spring
- white scalloped card base: 4.6" x 4.6" (11,7 x 11,7 cm), folded
- white cardstock: 4.2" x 4.2" (10,7 x 10,7 cm)
- colored cardstock
- colored ink pads
- embossing folder
- white and black gel pen
- glue, double-sided adhesive tape, self-adhesive foam pads

Cut out all three bunnies from colored cardstock. For more depth shade all pieces on the edges with colored pads and paste them together.


Prepare the base for three cards. Cut squares and frames from a white cardstock. For embossed background I used a dotted lattice embossing folder.


Each square and frame paste on the card front with double-sided adhesive tape. Attach the bunnies with adhesive pads and we're done.


You can check all the amazing collection of dies at the CottageCutz Store. By the way, check out the BIG Anniversary Sale.

Have a nice day. 
Janja


Saturday, February 25, 2017

Easter Cross & Tulips

Hello Scrapping Cottage friends! Thanks for taking the time to stop and visit today. It's Mary Marsh here bringing you the Saturday edition of the Blog.

We have some fabulous new Spring dies in the store. Today for your viewing pleasure, I am featuring the Butterfly Cross die.

 I started my card by using this weeks sketch #633 from Splitcoaststampers. Using a sketch almost always is a good starting point for me. When I saw the layout and the rectangle layer in the circle I thought of using the Butterfly Cross die for that part of the sketch.

Daffodil Yellow Card Base: 5 1/2" x 4 1/4"
Patterned Paper Layer: 5 1/2" x 2 7/8"
Circle Dies: 2nd largest in set
Stitched Circle Die: 3rd largest in set

I wanted the card to be bright to reflect the Spring & Easter season. So I looked through my stash first for patterned paper. I chose this lilac striped paper and decided to pair it with a daffodil yellow card base.

I cut the first elements of the sketch: the card base, patterned paper circle, purple layering piece and the scalloped border. For the scalloped border, I used the Sweet Love Border die. When I placed it underneath the patterned paper, I moved it up just to reveal the scallop edge. For the lilac layer above the patterned paper, I cut it 3/4" x 5 1/2". It's not necessary to use a bigger piece of cardstock to layer in this case.
 
I cut the Butterfly cross in lilac. I decided to add some tulips at the base of the cross. The tulip die is from the Hello Spring die set. This was a 2016 spring release. I cut the tulips in yellow to pick up the card base color. Easter sentiment is stamped in Tuxedo Black ink.

The greenery under the tulips is the snow bank from the Snowman w/Lamp Post die set. I cut it then placed it in the circle die and cut it again to get the rounded edge. Just another way to get more mileage out of the dies you already own.
To complete my card, I added a butterfly. I used the butterfly die from the Fancy Pocket Plus die set. I cut it in with the lilac cardstock and then a top layer of daffodil yellow patterned paper. Finished it off with a couple of light yellow pearls. 

Well, that's it for me for this week's post. Just a reminder that we are having a Design Team call right now. You can get all the info here. So until next time.........
 
Dies I used to create card:


http://www.scrappingcottage.com/cottagecutzbutterflycrosselites.aspx
 
http://www.scrappingcottage.com/cottagecutzfancypocketplus.aspx

http://www.scrappingcottage.com/cottagecutzsweetloveborders.aspx

http://www.scrappingcottage.com/search.aspx?find=snowman+w%2flamp+post
 
http://www.scrappingcottage.com/cottagecutzcirclesetbasics.aspx

http://www.scrappingcottage.com/cottagecutzstitchedcirclesetbasics.aspx


Tuesday, July 19, 2016

Beach cabins

Hi, Janja here!

Today I share with you a hello card in vivid colors. Fresh, cute and suitable for creating, even in these hot days. It can also be used as an invitation to a cocktail party, or instead of a postcard from our vacation.


For the card we need:
- brown card base: 5.3 x 5.3" (13,5 x 13,5 cm), folded
- white drawing sheet: 4.9 x 4.9" (12,5 x 12,5 cm)
- white cardstock
- Memento ink: Lady Bug, Cantaloupe, Tangelo, Summer Sky, Pear Tart
- Distress ink: Broken China

Spray a drawing sheet with a brush. This will be our background.


From a white cardstock with the die build-a-house set 1 cut out cabins, roofs and windows. Larger cabins with the die are not cut completely. Complete them with a scissors. Also prepare an inscription and waves.


Paint cutouts with an ink pads so that the entire surface of a pad is being dragged over the cutouts. Choose vivid colors.
 

On cabins, fasten roofs and windows. Paste them to the background.
 

Add the wavy sea, the inscription and for the icing on the cake, a birdie.
 

I would like to remind you on our CottageCutz challenge #4 - greenery. Join us.
Thank you so much for stopping by! 
Janja
List of dies used:


Wednesday, July 13, 2016

Screen Divider Card + Tutorial


Hello Scrapping Cottage friends! Thanks for taking the time to stop and visit today. It's Mary Marsh here bringing you the Wednesday edition of the Blog.

Today for your viewing pleasure, I am featuring dies from both the May "this & that" release & the June "home sweet home" release. I have also created a screen divider card and I will give you all the details on how you can create one as well. You can use your CottageCutz dies in a fun and creative way with this style card.

Card Base: 5 1/2" x 11"
Decorated Panels: 2 5/8" x 4 1/4"

Step 1: Score 5 1/2" x 11" cardstock at 2 3/4", 5 1/2", and 8-1/4" in the horizontal position.

Step 2: To create the Screen Divider fold, fold in half at 5 1/2" score then fold each side back in the opposite direction on the scored lines.


Step 3: Unfold card and lay flat. Using a border punch, create a punched border along the top edge of the card. I used a Martha Stewart trellis punch. I started punching at the 5 1/2" center point and worked my way across the card.
Step 4: To create "legs" at the bottom of the screen you can either use a punch or a die. For my card I used a punch. I worked with half of the card at a time. Keeping the two left panels folded, slide the bottom of those two panels into the punch (only 2 layers at a time will work). Position the cardstock about one-third of the way into the punch and center side to side, then punch.


Step 5: The screen divider is ready for decorating.

I started my 1st panel by sponging in some clouds with a light blue ink using a cloud template.
Die-cut the pieces for this panel using the grass, trees & vines, build-a-house accessories, spring stamps and fancy pocket plus dies. Bike is cut in a coral cardstock, tree in gumball green and matching patterned paper, birdhouse in pool party.
 
The next panel I used the same light blue ink to sponge the panel and a medium green for the grassy area. The dies are from the same sets listed above.
 
The 3rd panel is using the same dies listed above plus the garden accessories & hello spring dies. I cut a stencil from the clouds & sun die and sponged in the sun in the upper corner. I also added clouds and a grassy area. I wanted some small butterflies so I used a punch for those.


On the last panel I used the spring bloom corner and the bicycle in grass  and the fancy pocket plus dies. I sponged the background in the light blue ink. My corner is cut in coral cardstock and the butterflies in a rich razzleberry cardstock.
 
 
I adhered the panels to the screen divider and to hold in place I used some light blue ribbon that matches the card base.


Here are some other close-up shots of the card panels.


And, that my friends is my card for this week. Thanks for sticking with me till the end of this post. I know it was a long one. Don't forget about our current challenge. This one is Greenery. Get more info here. So until next time......inky hugs.
http://www.scrappingcottage.com/cottagecutzbuild-a-houseaccessories.aspx

http://www.scrappingcottage.com/cottagecutzgardenaccessories.aspx

http://www.scrappingcottage.com/cottagecutzcloudsandsun.aspx

http://www.scrappingcottage.com/cottagecutzgrasstreeandvines.aspx
http://www.scrappingcottage.com/cottagecutzfancypocketplus.aspx

http://www.scrappingcottage.com/cottagecutzspringstamps.aspx
http://www.scrappingcottage.com/cottagecutzspringbloomcornerelites.aspx